A Field Protocol for Flooring Systems That Prevents Six-Figure Failures
Mock-ups are intended to predict real performance — but in most projects, they don’t. Traditional mock-ups focus on appearance instead of the forces that actually cause flooring failure: moisture, adhesive behavior, rolling loads, point loads, chemicals, humidity swings, and electrical performance.
After more than 25 years of forensic failure analysis, StaticWorx has identified the field conditions that matter most — and developed a structured protocol that recreates real-life stresses before a floor is installed across an entire facility. This approach does more than validate aesthetics: it confirms whether the system will perform under the worst conditions the space will ever see.
Why Most Mock-Ups Fail to Predict Anything
Typical mock-ups are:
- too small
- built in ideal conditions
- not tested under load
- not exposed to humidity extremes
- not evaluated for ESD performance
- not representative of actual installation sequencing
- not designed to generate measurable, enforceable data
The result? Floors that look perfect at installation but fail months later — telegraphing, denting, whitening, blistering, losing adhesion, or falling out of electrical specification.
This protocol changes that.
Step 0: Define Reality Before You Build Anything
The 1–2 Page Document That Prevents Disputes
Before installation begins, document the actual performance the floor must survive. Replace vague phrases (“heavy traffic,” “chemical resistant,” “durable”) with measurable, enforceable, pass/fail criteria grounded in field conditions.
Map Real Loads, Not General Categories
- Rolling loads: Specify actual cart/equipment weight, wheel type, wheel diameter, and turning behavior.
- Point loads: Document equipment foot dimensions, pad size, and static/dynamic load.
- Chemical exposure: List actual chemicals and cleaning agents used in the facility.
- Environmental swings: Consider seasonal humidity and temperature changes.
- UV exposure: Note natural light exposure and potential for thermal expansion.
Write Enforceable Acceptance Criteria
Examples:
- “No whitening, softening, or surface attack after 24-hour exposure to 70% IPA.”
- “No seam peaking >1/32″ following 1,000 rolling cycles at 800 lbs load.”
- “Walking body voltage ≤100V at 20% RH using facility footwear.”
- “Wet DCOF ≥0.42 per ANSI A326.3.”
Define Variables
If multiple adhesives, moisture mitigation systems, primers, seam methods, or installation sequences are being evaluated, each variable must be tested independently.
If you cannot define failure, you cannot prove success.
Step 1: Choose a Location That Reveals Real Risk
Minimum 300–1,000 ft² of Real Conditions
Avoid unused conference rooms. Choose a location that includes:
- an expansion joint
- at least one transition
- slopes or drains
- pivot zones where powered equipment turns
- temperature or humidity variations
Panel Bay System
Create 8′ × 10′ test bays, each representing a different installation variable — identical except for the specific component being evaluated (adhesive type, moisture system, seam detail, primer, etc.). Install all bays on the same day to avoid weather-driven variability.
Step 2: Substrate Diagnostics That Predict Failure
Proper substrate evaluation is the foundation of any successful installation.
Surface Prep (ASTM F710)
- Sound: No hollow areas or delamination.
- Clean: No curing compounds, sealers, paints, or residues.
- Smooth: Flat within 1/8″ in 10′.
- Dry: Verified using in-situ RH testing.
Moisture Testing (ASTM F2170 – Required)
In-situ RH testing determines whether the adhesive or flooring is compatible with the slab.
- Acclimatize space to service conditions for 48 hours
- Drill test holes to 40% concrete depth;
- Test at multiple locations.
- Document probe IDs, calibration dates, timestamps.
Calcium Chloride (ASTM F1869 – highly recommended)
- Measures the actual rate of moisture vapor emission at the slab surface
- Highly useful but often ignored. ASTM F2170 does not measure surface emissions
- Acclimatize space to service conditions for 48 hours
- Three tests for the first 1,000 sq ft and one additional test for each additional 1,000 sq ft (or fraction thereof)
- Test duration: 60 to 72 hours
ASTM F2170 tells you the long-term moisture risk of the deep slab once the floor is installed, while ASTM F1869 reveals the actual surface vapor load that adhesives and finishes must withstand. Because the tests measure different layers of the slab, running both tests gives the only complete picture of current conditions and future risk.
pH Testing ASTM F710 (Standard Practice for Preparing Concrete Floors to Receive Resilient Flooring) requires pH testing and describes acceptable ranges.
Because ASTM F standards don’t include a pH test, we recommend ASTM D4262—the only standardized, reliable method for checking concrete alkalinity and preventing adhesive or flooring failure.
- High pH originates from cement hydration (calcium and alkali hydroxides) and rises to the surface whenever moisture transports those alkaline ions upward
- Resinous Systems: Pull-Off Testing (ASTM D7234)
- Confirms primer and coating adhesion; record failure mode.
Step 3: Building the Mock-Up: The flooring or coating must be installed exactly according to the manufacturer’s written instructions, and that installation becomes the patch being evaluated by ASTM D7234
Document every variable:
- date, time, ambient temperature, RH
- slab temperature and RH
- product names and lot numbers
- trowel notch size and actual spread rate
- Types of rollers or squeegees used
- open time and working time
- roller weight and rolling schedule
- seam method and timing
- cleaning, adhesive application, and cure conditions
Install all assemblies under the same environmental conditions whenever possible.
Step 4: Proper Conditioning Before Testing
Patience Prevents Failures
Manufacturer cure times must be followed precisely. Foot traffic ≠ rolling traffic. The space must be conditioned to service temperature and service RH, not construction conditions.
Step 5: Physical Performance Testing
Simulating the Real Stresses Your Floor Will Experience
A. Rolling Load Testing (Field Simulation)
Use actual facility carts or equipment.
- worst-case load + 20% safety factor
- 1,000 figure-8 cycles across seams
- include pivot rotations and directional changes
Evaluate:
- seam peaking
- bond failure
- telegraphing
- edge lift
- finish wear
- appearance and corrective actions required
Reference: ASTM F2753 (rolling load definitions).
B. Static/Point Load Evaluation
Simulates ASTM F970 but applied to the installed system.
- apply actual equipment load for 24 hours
- remove load; measure recovery at 1, 24, and 72 hours
- record permanent indentation
C. Short-Term Indentation (ASTM F1914 Methodology)
Useful for healthcare and lab environment
D. Slip Resistance of Resilient Floors (ANSI A326.3 – Wet DCOF)
Use BOT-3000E or equivalent.
Manufacturers of resinous floors do not certify to A326.3 because the standard is tied to the BOT-3000E DCOF method for manufactured tile.
The correct slip-resistance standards for epoxy/resinous floors:
- ASTM E303 – British Pendulum (widely used internationally; valid for wet/dry and field installations)
- ASTM D2047 – James Machine (dry only; used for coatings with slip additives)
- Occasionally ASTM F2913 for footwear/floor interaction
E. Abrasion Resistance (ASTM D4060 – Optional but Informative)
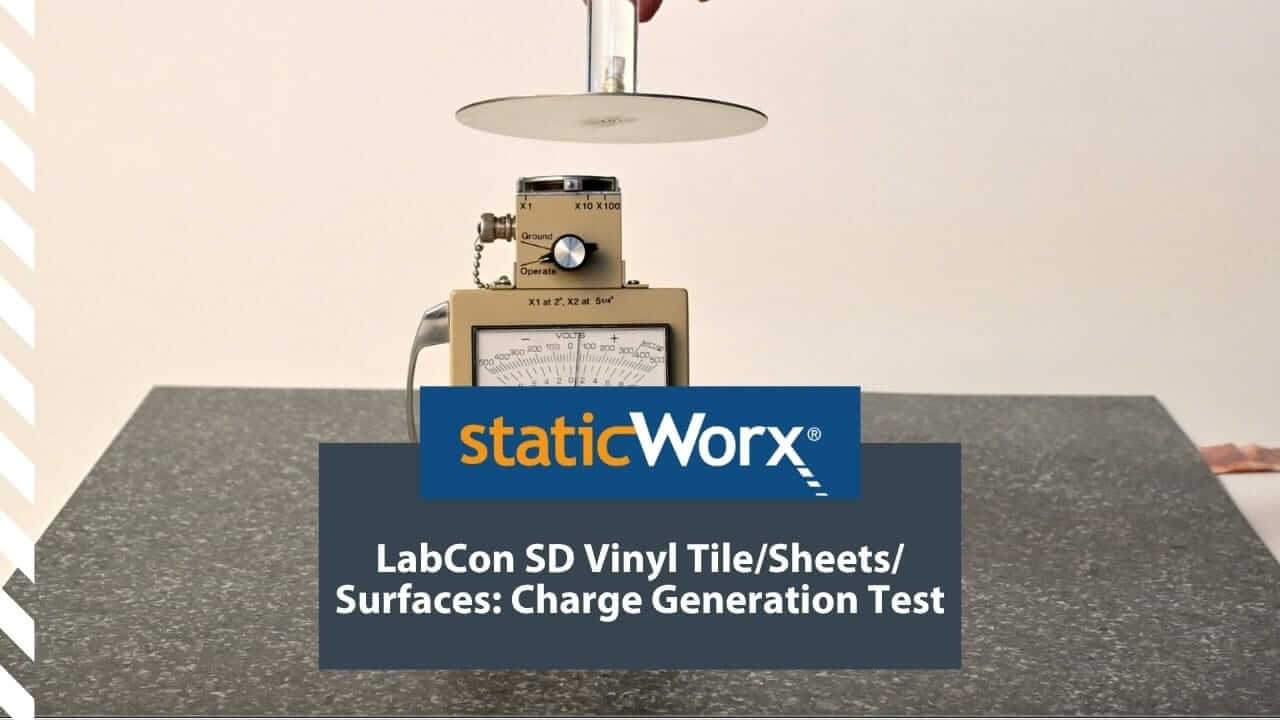
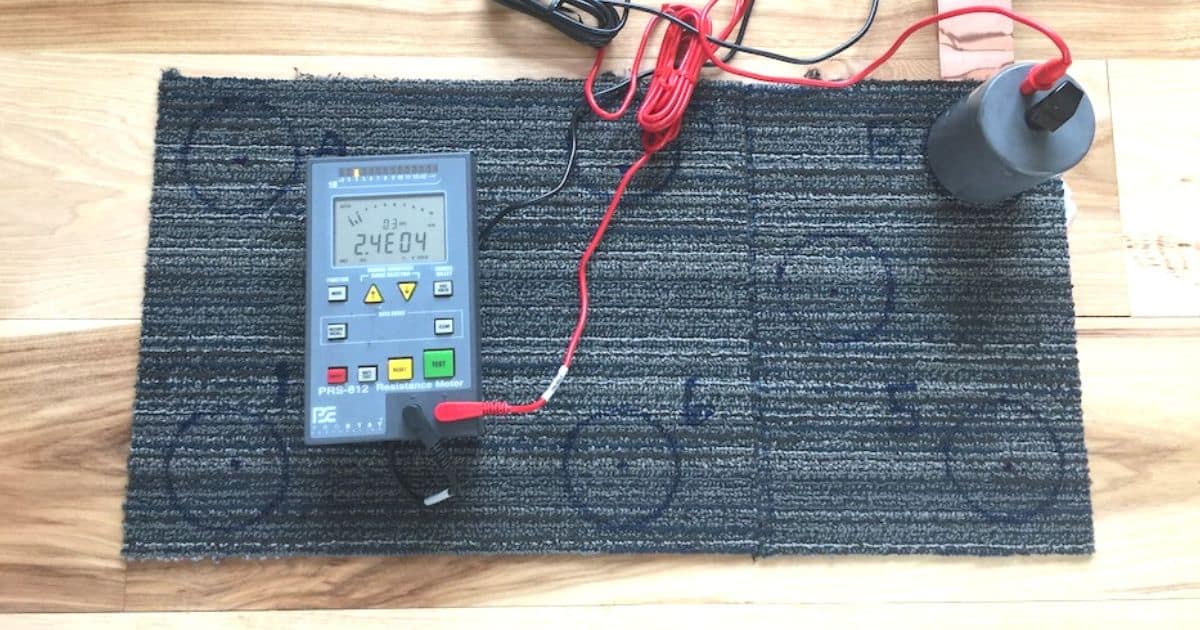
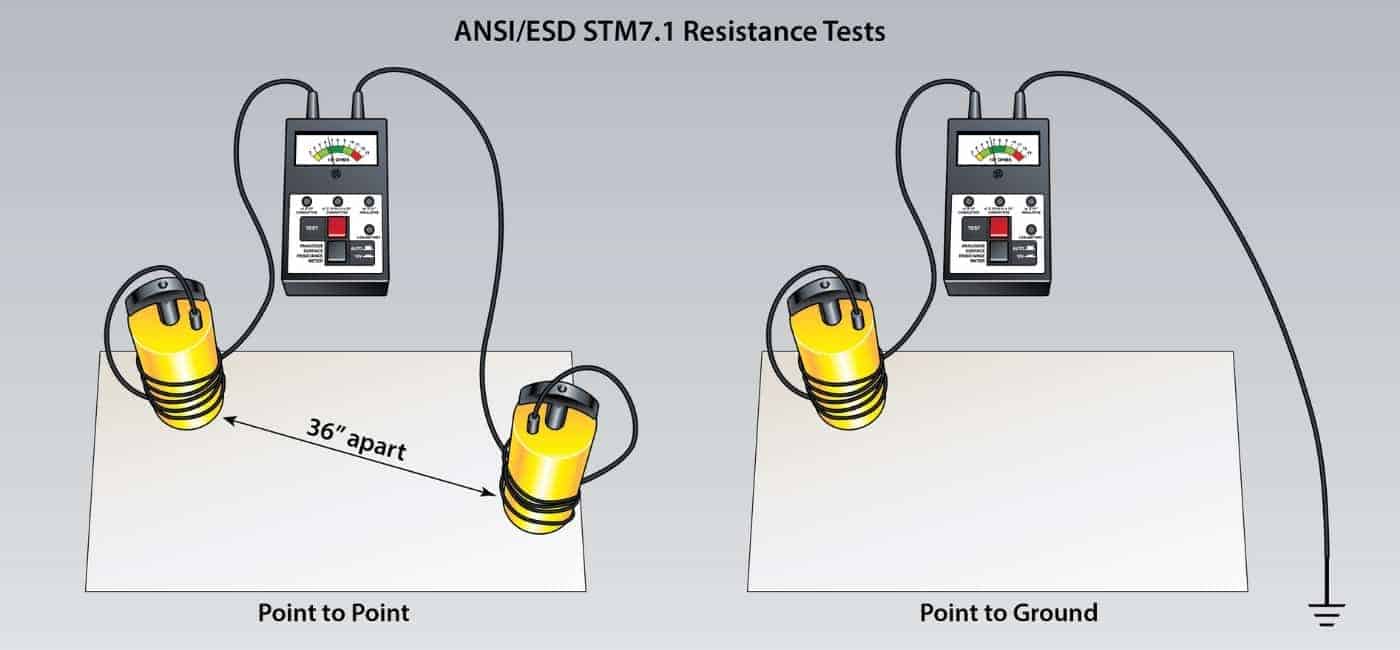
F. ESD Compliance (ANSI/ESD STM7.1, STM97.1, STM97.2)
Test:
- Floor resistance
- Flooring/footwear system resistance
- Flooring/footwear body voltage generation (critical)
Conditions:
- lowest expected humidity
- actual footwear
- multiple test subjects
- multiple locations
Most facilities require <100V. (Specialized environments may require lower.)
Step 6: Chemical Resistance Testing
Test What Will Actually Be Used
Create a grid and test your real chemicals using:
- ASTM F925 for resilient flooring
- ASTM D1308 for resinous coatings
Document:
- discoloration
- softening
- gloss changes
- blistering
- adhesion loss
Photo at baseline, 1 hour, 24 hours, and 72 hours
Final Documentation Package
A complete mock-up report should include:
- Executive Summary
- Test Conditions
- Substrate Data
- Physical Performance Results
- Chemical Resistance Matrix
- ESD Testing Data
- Installation Notes
- Recommendations
- Appendices (photos, raw data, product datasheets)
The ROI of a Proper Mock-Up
- Cost of accurate mock-up: $15,000–$30,000
- Cost of failure across 50,000 ft²: $500,000–$1,000,000+
A rigorous mock-up is an insurance policy against system failure, premature wear, dimensional instability, adhesive breakdown, moisture vapor issues, and ESD noncompliance.
StaticWorx Support
StaticWorx assists teams with:
- mock-up design
- ESD testing equipment
- installation and grounding guidance
- interpretation of test results
- system recommendations
- The best mock-up isn’t the one that looks perfect on Day One — it’s the one that prevents a failure on Day 600.
StaticWorx Technical Services
617-923-2000
tech@staticworx.com